Wednesday, September 24, 2014
Tuesday, September 23, 2014
Thursday, September 18, 2014
Crock Pot Cream Cheese Chicken Chile
FRIDAY, NOVEMBER 11, 2011
Crock Pot Cream Cheese Chicken Chile
Here's a super easy crock pot dish.
It starts with two frozen chicken breasts.
Put all the ingredients in a crock pot.
Drain and rinse the beans.
Give it a stir and top with cream cheese.
in the cheese. Or just stir when you get the chance.
Shred the chicken before serving.
Put all the ingredients in a crock pot.
Drain and rinse the beans.
Give it a stir and top with cream cheese.
Cook on low for 6-8 hours.
If you're home stir after 2 or 3 hours to blendin the cheese. Or just stir when you get the chance.
Shred the chicken before serving.
Serve over rice.
Some chopped cilantro would be nice.
Crock Pot Cream Cheese Chicken Chili
(that's a mouthful!)
2 chicken breasts, still frozen
1 can Rotel tomatoes
1 can corn kernels, do not drain
1 can black beans, drained and rinsed
1 pkg. Ranch dressing mix
1 T cumin
1 t chili powder
1 t onion powder
1 8-oz pkg. cream cheese
_________
Put the chicken in the crock pot.
Top with the tomatoes, corn,
the drained and rinsed beans,
ranch dressing, cumin, onion and chili powders,
stir to combine then top with the cream cheese.
Cook on low for 6-8 hours, stirring one or twice
to blend in the cheese.
Shred the chicken into large pieces
and serve over rice.
Can also serve in tortillas or taco shells.
Serves 4
Tuesday, September 16, 2014
Friday, September 12, 2014
Luckily
for me, in this month’s theme of ideation, Shane has offered up his five
essential books on lateral thinking. Here we go…

by Benjamin Franklin
One of the less-known secrets of incredible successes is they tend to obsess with biographies of great women and men that came before them. Franklin’s autobio is a superlative book about a boy (then man) who consistently defied convention and changed the world not by cutting corners but by finding alternate routes; it’s changed the way I think about problem solving in every aspect of my life.

by Maria Konnikova
Sherlock Holmes was the superlative sideways thinker, and in Mastermind Ms. Konnikova elucidates why and how. In the spirit of studying great thinkers, this bio-fic has made me think more differently than almost any other biography.

by Austin Kleon
This art project in a book will flip your script on creativity—and that’s the point of lateral thinking. (It’s also highly entertaining.)

by Dubner and Levitt
This book is awesome. In it, the Freakonomics guys come back for a third round, this time with a how-to guide to thinking thoughts that create breakthroughs.
 Book 5: Smarter Than You Think: How Technology Is Changing Our Minds for the
Better
Book 5: Smarter Than You Think: How Technology Is Changing Our Minds for the
Betterby Clive Thompson
This book got me to reassess how I think about my brain itself, and question my relationship with technology. It’s A+ in getting you into the mood to think a little differently—and with the confidence that you can be smarter than you are.
Thursday, September 11, 2014
hip opening yoga
A Simple Yoga Sequence To Open Your Hips If You Sit Too Much
Our hip flexors can become really tight and shortened from sitting too much, which can lead to lower back issues.
So it's important for not just our sedentary society to stretch their hip flexors daily, but also for runners, walkers and cyclists. We can all benefit from stretching out our hip flexors, whether it's to open up tight areas from sitting too much, or to help counterbalance prolonged or strenuous hip flexion from a more active lifestyle.
Yoga is great for stretching these areas. There are many asanas you can ease yourself into, to allow for a gentle opening of the hips. Here is a simple six-pose sequence that you can hold for five slow breaths, and allow your body to soften for optimal hip flexor relief. Be sure not to force yourself into any of these poses, but move with patience and intuition based on what is best for your body. Always be sure to complete both sides of the body in each pose!
1. Low Lunge (Anjaneyasana)
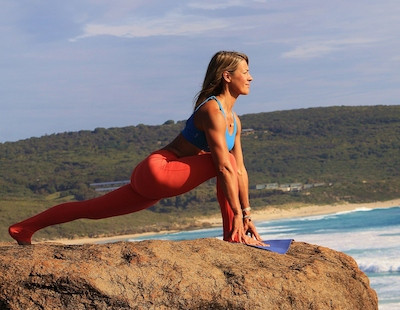
Low lunge is ideal for those who find balancing difficult. This stretch focuses on the hips, groin and quadriceps.
From standing, exhale and step your left foot back and lower it to the floor with your hands framing your front foot. You can bring your hands to blocks or to the floor, just be sure to keep your right foot between your hands, and directly below your knee. Inhale and lift your chest to reach up and forward, pressing the shoulder blades in against the back. Keeping your hips square, draw the tailbone down and gently pull your belly in toward your spine.
Hold here or for a deeper stretch, inhale and reach the arms over the head with your palms facing in. Be mindful to lift out of the pelvis so you don't jam the lower back.
2. Crescent Lunge (Anjaneyasana Variation)
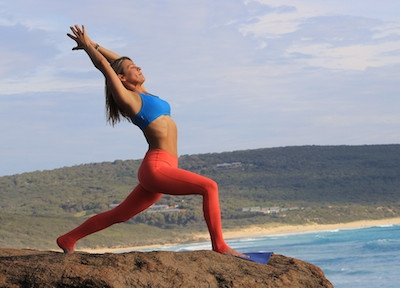
Crescent lunge opens the front of the body, extends the spine and builds leg strength and balance. The psoas muscle of the main hip flexor is targeted, as the thigh bone moves away from the lower back. The nervous system is awakened and the heart is opened.
From Low Lunge, tuck the back toes and exhale as you lift the back knee off the floor and stand up into the pose. Feet are hip width apart and both toes face forward. Start with your hands on your hips and bend the front knee to 90 degrees, with your knee over the ankle and hips pointing straight ahead. Keep the back leg bent if the hamstrings are tight, and only straighten if you can keep the pelvis square to the front of your mat. Draw the left hip forward and right hip back to keep the hips square, and tuck your tailbone to keep the pelvis from tipping forward. For more extension, inhale and raise the arms, hands apart and palms facing in, and soften the shoulders.
3. Warrior I (Virabradhasana I)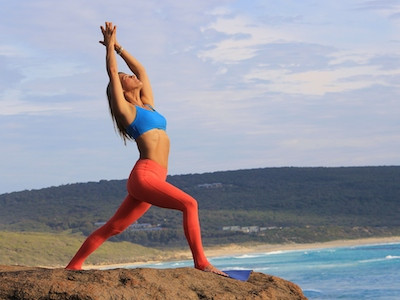

In Warrior I, the turned-out toes of the back foot increases hip flexion. If you press into the outer edge of your back foot, you will notice the hips square off more easily. This pose builds strength and steadiness, as it increases body awareness, improves circulation and energizes the entire body.
From Crescent Lunge, drop the back foot to 45 degrees and soften the shoulders away from the ears. Inhale and reach the arms above the head and soften the shoulders away from the ears. Exhale to soften into the front bent knee, keeping it at 90 degrees.
For a deeper stretch try reaching the right hand toward the floor and feel the hip flexor get a bit more love!
4. One-Legged King Pigeon Pose (Eka Pada Rajakapotanasana)
Pigeon pose releases tension from deep in the outer hip joint, and many people feel this stretch releases emotional tension as well. With the forehead resting in a forward fold, the nervous system is also relaxed.
From Warrior I, release your hands to the ground and fold the front leg to the floor, tucking the heel in
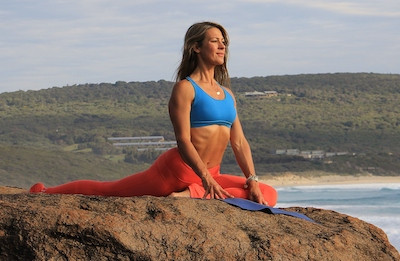
close to the left groin and you slide your left leg back behind you. The front shin should rest on your mat at about 45 degrees, but you might be able to rest it in parallel to the top line of your mat. Keep the front foot flexed to protect the knee and make sure the back of the left foot behind you is flat on the ground. Square off your hips.
Stay here, or walk the hands forward and lower the torso to the ground, and rest the forehead on the hands, block or mat for at least five breaths.
To take this pose deeper, walk the hands back in by your sides and inhale to reach them above your head. Keep reaching up out of the pelvis to protect the lower back. Hold for another five breaths and return your hands to the floor.
5. Supine Pigeon (Supta Kapotasana)
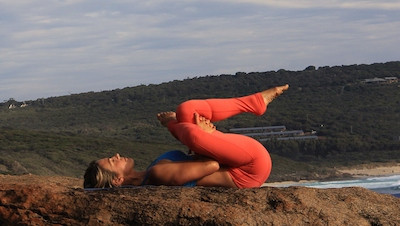
If tight knees and hips mean Pigeon pose isn’t for you, try it lying down. This pose is a great preventative knee stretch as it will lengthen the iliotibilial band (ITB) that runs from the pelvis (on the outside of the leg) to the shin bone.
Begin with the soles of your feet on the floor and lift the left ankle and rest it on top of the right knee, keeping the left foot flexed. Bring the knees closer towards the chest, and thread your left arm between the legs and the other hand around, to join them together behind the right thigh.
Keeping the hips low to the ground, draw in the clasped thigh closer to the chest and open the opposite knee wider. Soften your shoulders into the mat.
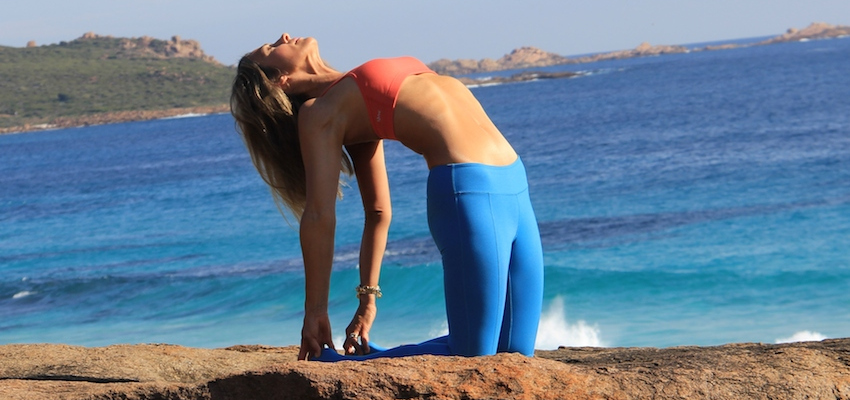
6. Camel Pose (Ustrasana)
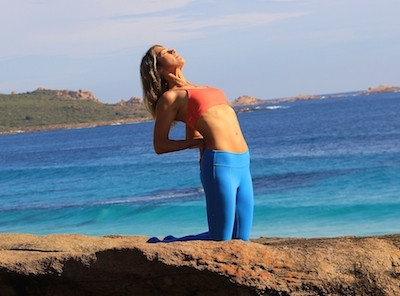
An invigorating stretch that will open the entire front of the body and stretch the front of the hip flexors.
Kneel with your legs shoulder width apart, with the feet untucked and palms placed on the lower back, fingers facing down. Inhale to lift and open the chest, exhale to lower back towards your heels, keeping the gaze upwards. Be sure not to just throw your head back. Use the fingers in the back to encourage tucking the tailbone and prevent jamming in the lower back.
Hold the pose here, or for more extension, release one hand at a time to lightly grip the tops of the heels. Inhale to lift up and out of the pose by pressing on your lower back.
Photo Credit: Courtesy of the Author
Tuesday, September 2, 2014
12 uses for coconut oil
COCONUT OIL
12 Weird Beauty Uses for Coconut Oil
Is there anything it can't do?!
PUBLISHED: MARCH 27, 2014 | BY BEAUTY HIGH

SHUTTERSTOCK
By Augusta Falleta for Beauty High
Finding a good beauty product is like making a new friend. But finding a product that can help with practically every beauty issue out there is like finding the holy grail. Coconut oil, which is all-natural and available at just about every grocery store within a two-mile radius of wherever you are right now, is that holy grail. The evidence? These 12 weird beauty uses for coconut oil:
Oil Pulling
If you haven't heard the buzz about oil pulling yet, it's time to get on the bandwagon. Swishing coconut oil around in your mouth for 20 minutes a day (preferably at the beginning of the day, before you brush your teeth) may help to detoxify your body, cure headaches, whiten teeth, and more.
If you haven't heard the buzz about oil pulling yet, it's time to get on the bandwagon. Swishing coconut oil around in your mouth for 20 minutes a day (preferably at the beginning of the day, before you brush your teeth) may help to detoxify your body, cure headaches, whiten teeth, and more.
Softening Cuticles
If you wash your hands often or your cuticles just need a little T.L.C., apply coconut oil to your fingers twice a day.
If you wash your hands often or your cuticles just need a little T.L.C., apply coconut oil to your fingers twice a day.
Treating Dry Ends
Apply a pinch of coconut oil to the ends of your hair to help dry, damaged tips get a huge dose of moisture.
Apply a pinch of coconut oil to the ends of your hair to help dry, damaged tips get a huge dose of moisture.
Exfoliating
Coconut oil makes a great base for DIY body scrubs. Mix it with granulated sugar, and apply the concoction for some seriously smooth skin.
Coconut oil makes a great base for DIY body scrubs. Mix it with granulated sugar, and apply the concoction for some seriously smooth skin.
Soothing Sniffles
Whether you have a runny nose or allergies, rub just a bit of coconut oil inside your nostrils for relief.
Whether you have a runny nose or allergies, rub just a bit of coconut oil inside your nostrils for relief.
Moisturizing Lips
Spread coconut oil over your lips before bedtime for hydration that tastes amazing throughout the night.
Spread coconut oil over your lips before bedtime for hydration that tastes amazing throughout the night.
Removing Makeup
If you have trouble getting off that last bit of mascara, use a dab of coconut oil. Just be careful to not get it directly in your eyes.
If you have trouble getting off that last bit of mascara, use a dab of coconut oil. Just be careful to not get it directly in your eyes.
Protecting Against Razor Burn
Apply coconut oil before shaving to prevent irritation. Bonus: This shaving cream swap makes it easier to clean your razor.
Apply coconut oil before shaving to prevent irritation. Bonus: This shaving cream swap makes it easier to clean your razor.
Preventing Wrinkles
Use coconut oil on the area around your eyes to prevent wrinkles and under-eye bags.
Use coconut oil on the area around your eyes to prevent wrinkles and under-eye bags.
Treating Acne
Apply coconut oil to blemishes, and leave it on for about 15 minutes. Then wash it off with warm water and let your skin air dry (don't apply any other products). The anti-bacterial components in the oil will work to combat acne.
Apply coconut oil to blemishes, and leave it on for about 15 minutes. Then wash it off with warm water and let your skin air dry (don't apply any other products). The anti-bacterial components in the oil will work to combat acne.
Boosting Hair Growth
Apply coconut oil to any areas where hair is sparse (especially in your eyebrows) to promote cell growth.
Apply coconut oil to any areas where hair is sparse (especially in your eyebrows) to promote cell growth.
Relieving Sunburns
Apply the oil after you’ve overdone it on the sun exposure to soothe your skin.
Apply the oil after you’ve overdone it on the sun exposure to soothe your skin.
Subscribe to:
Comments (Atom)

-
Marilyn + Tom {A Celebrity Vegas Wedding} Filed in: Weddings 42 comments Update: All photos of Matthew Gray Gubler have been remov...
-
A Duke University study found that 40% of what we do (and that includes you) is mindless habit. That’s both useful (saves energy) and dange...


